I bought this tablet on a whim in “as-is” condition from the store of my all-time favourite ebay seller in the world since I’d had good experiences fixing broken items I’ve bought from the company in the past. I bought my laptop “as-is” from this particular company for some astonishingly low price when all that was needed was to replace the cable connecting the LCD to the motherboard. The screen itself was fine. I’ve got e-readers, game consoles, and other items from the two ebay shops this company runs that sell only “as-is” and broken items. All of them have ultimately turned out to be fixable for significantly less than the price of equivalent merchandise that’s not sold “as-is”. It’s a great little secret that I’m hesitant to even mention because now the two people who read this blog will become new competition in the auctions.
In any case, I’ve never owned an Android device before so I thought a $10 tablet was a good place to start. I thought a cheap tablet would be good for a noob like me. Boy howdy, was I sure wrong about that. The tablet was fine when I got it. It was missing the volume keys but that’s not really a problem because you can adjust the volume via the menus using the touch screen. It has a reset hole like old Macintosh computers for when it crashes. You can use a straightened paperclip to press it.
The documentation/support for the tablet is actually decent. The ADB drivers on the Velocity Cruz website actually work. The instructions, however, are incomplete. Although the correct hardware ID is listed in the driver inf file, nowhere does it mention that you must create the file C:\Users\yourname\.android\adb_usb.ini. Note that there’s a period before the name of the directory.
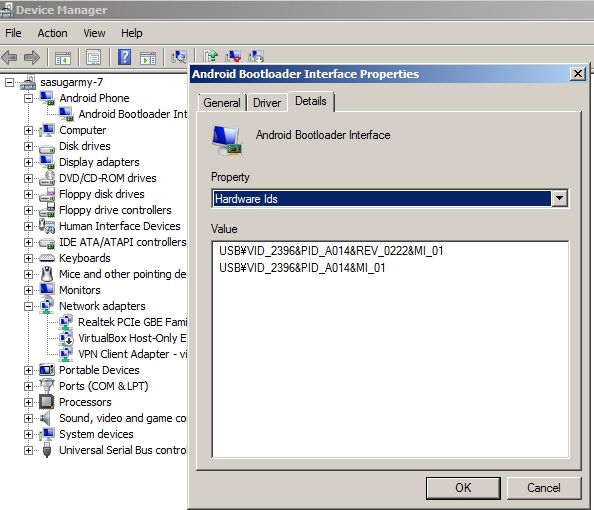
The correct vendor ID for the PS47 is 0x2396. You can verify this by going to Device Manager and clicking on Details and then choosing “Hardware Ids” from the drop-down menu:

If you haven’t yet installed the drivers, look for a device called rk2918sdk, right-click it and choose “update drivers”. Choose “Browse my computer for driver software”-> “Let me pick from a list of device drivers on my computer” -> remove the checkmark from “Show compatible hardware” -> click “Have disk” -> “Browse” and choose the “android_winusb.inf” downloaded from the Velocity Cruz website. Install it anyway if Windows warns you it’s not signed.
Anyway, once I figured out how to get ADB working I saw by running cat /proc/mounts that the /system partition is cramfs, which is not writable. That was why SuperOneClick and all those other “one-click” solutions failed. “Great”, thought I, “I’ve got a useless tablet now. It’s no use at all if you cannot write to /system”. But that’s not true, I’ve since realised. That was why even though I could get an ADB shell as root (as I’ve read is the case with most rk2918 tablets) the command “mount -o remount,rw -t cramfs /dev/block/mtdblock4 /system” still kept giving the error “read-only filesystem”.
I was on the verge of despair until I found this excellent website which explains how to dump your stock ROM, convert it to ext3, and then reflash it to your rk2918 device.
I wanted very much to try the guide but I couldn’t figure out how to get the PS47 into flash mode. The website is correct that you must hold the volume – (minus) button while plugging in the USB cable with the device powered off. I was just not persistent enough at first. Perhaps it’s because the only way I could hold the volume minus button was by using a paperclip, since the buttons themselves are missing on this unit. It ended up taking me about 20 attempts but eventually I got it into flash mode. The thing about flash mode though that’s confusing to a noob like me is that the screen doesn’t turn on on the PS47 when it’s in flash mode. It looks like it’s still turned off. So the only way to know if you’ve succeeded in getting into flash mode or not is to do what the website says and check the results of lsusb (or if you’re using Windows, something like USBDeview). I succeeded eventually though at getting into flash mode and went ahead and flashed the new ext3 image but I couldn’t get the tablet to boot afterwards. The tablet would just hang at the boot logo where it displays “Cruz”. I tried the whole guide again from the beginning but still no luck getting it to boot. I must have missed some additional file that needs to be edited, maybe in the boot.img. Luckily I was able to simply reflash my backup boot.img and system.img to get back to where I started.
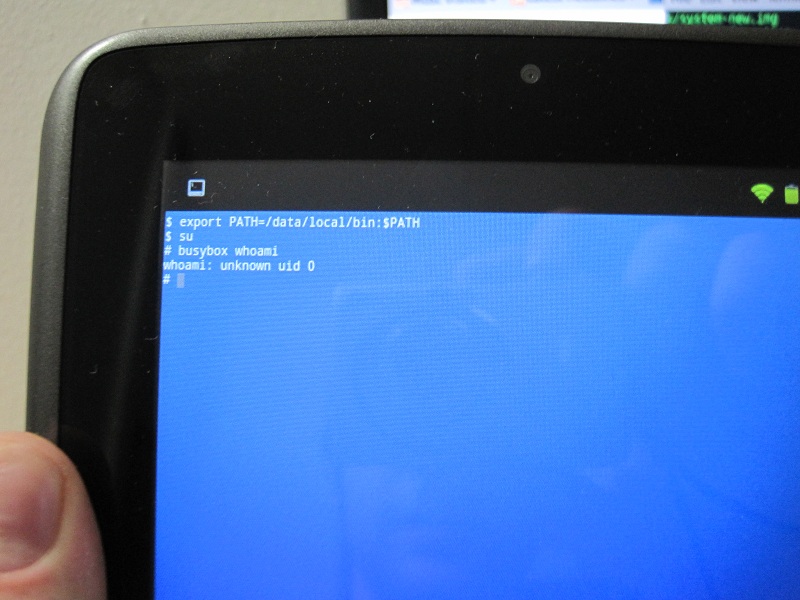
Then I had the bright idea of doing everything the guide says except, instead of trying to make an ext3 system.img I would unpack the stock cramfs system.img, chmod 6755 on /system/bin/su, repack it as cramfs, and flash it to my device. This basically worked. I rebooted after flashing the new image, opened the terminal emulator app that I had installed earlier to confirm I wasn’t able to su, tried “su”ing and sure enough, it worked. I then ran “busybox whoami” and it told me what I wanted to hear: I was rooted. Superuser.apk works, too. So does ROM manager. Unfortunately, this hasn’t allowed me to use Google Play, as I had hoped. But that doesn’t really matter, I suppose.
So here’s the basic process I followed. Most of it is exactly the same as the guide posted on the rk2918 tools website minus the ext3 bit. There’s no need to modify the boot.img at all for what I did. I don’t know if it was actually necessary or not, but I did the whole thing as root on a computer running Ubuntu.
cd ~/rk2918tools

./dump_imgs.py stock_imgs

cp -a stock_imgs new_imgs

cd new_imgs

sudo cramfsck -x system system.img

#Add the su binary from http://androidsu.com/superuser/

wget http://downloads.androidsu.com/superuser/su-bin-3.0.3.2-efghi-signed.zip

sudo unzip su-bin-3.0.3.2-efghi-signed.zip system/bin/su

sudo chmod 6755 system/bin/su

sudo chmod 777 system

sudo chown root:root system

mkcramfs system system_new.img

cd ../

./img-manager.py write system system_new.img

#wait to see the message "Image written successfully"

./rkflashtool b
Update: I discovered that Google Market works if you put vending.apk in /system/app before building the system.img and follow this guide. However, even after doing so I still couldn’t install Chaos Rings. It tells me my device isn’t compatible, though it does occur to me that it might actually not be related to hardware but instead simply because Square Enix can see I’m trying to install it from the United States, not Japan.

