
SPOILER ALERT: They ALL have dead CPUs.
I have dozens of these black screen systems. I have a basic flowchart for troubleshooting all SNESes in my head. It’s simple and progresses from the easiest fixes to the most difficult. But I’ll spoil it and reveal ahead of time that they almost all have dead CPUs that need to be replaced. It’s never the easy stuff.
The first steps are disassembly and cleaning the housing. Of course, the latter doesn’t fix anything, but time is money, and by cleaning the housing first I can leave it to dry while I work on the motherboard itself.
Step one is to clean the cartridge slot with a toothbrush and 91% alcohol. 99% is better but it’s more expensive and harder to find. 91% is good enough. Most folks recommend wrapping a credit card in a cloth, dipping it in alcohol, and then inserting and removing it repeatedly to clean the cartridge slot, but I’ve never understood this method at all. I don’t understand how that could possibly be very effective. A toothbrush seems like the obvious answer to me. For one thing, with the credit card and cloth method you’re only cleaning the removable top part of the connector, which is completely pointless if you don’t also clean the pins beneath it that are soldered directly to the board. For RGB, APU, and 1CHIP models I suppose the credit card method may be all right, since you can’t just lift the connector off on those. But a toothbrush just seems like a far better method to me. You need to use serious elbow grease when cleaning these things, and there’s no way to put the kind of force necessary behind your scrubbing if you’re just using a credit card wrapped in cloth.
Of course, rather than clean it, it’s faster to just grab a known working cartridge slot connector to test the system quickly. Keeping one handy saves time.
It’s pointless only cleaning the removable top part of the cartridge connector if you don’t also clean beneath. How on earth could you possibly clean a system like this with just the credit card method?
Cleaning beneath the connector is very important. If someone spilled something on the console long ago, you have to consider where gravity would have taken it. Soda spilled on top of the console wouldn’t have just sat on the top removable piece of the connector for all those years, so it’s rare to find much corrosion on the removable part. Any liquid spilled on top of the system would have run down through the connector and settled on the pins beneath. That’s why you tend to find rust and corrosion on these pins. Sometimes they look all green, like the Statue of Liberty. I scrub these with a brass brush to remove any corrosion, then clean them off with a different toothbrush and some cotton swabs. Deoxit is also good to use here.
Knowing how gravity works means this kind of result is predictable.
At this point you can test the system. If it works, great. You’re done. But the premise here is that these simple things usually don’t work. Most consoles don’t have so much corrosion, so, while cleaning is always a good idea for sanitary reasons, it rarely actually fixes anything. Ordinary dust and dirt won’t stop the console from reading games. So let’s move on to the next step in my flowchart.
If you hold the reset button on a working console while powering it on with a game inserted, you get a black screen until you release the button. The idea here is that if the reset button is very dirty (again, think spilled soda) then it can be stuck in the activated position, causing the same symptoms as if it were actually being held down. I’ve never actually seen this personally, but it’s an explanation that makes a lot of sense to me, so it has a place in my flowchart and I always first try cleaning the reset button with a toothbrush and a bit of alcohol. If it seems sticky I temporarily desolder and remove it just for testing. It never turns out to be the culprit, but it’s pretty quick to remove so it’s not much of a waste of time.
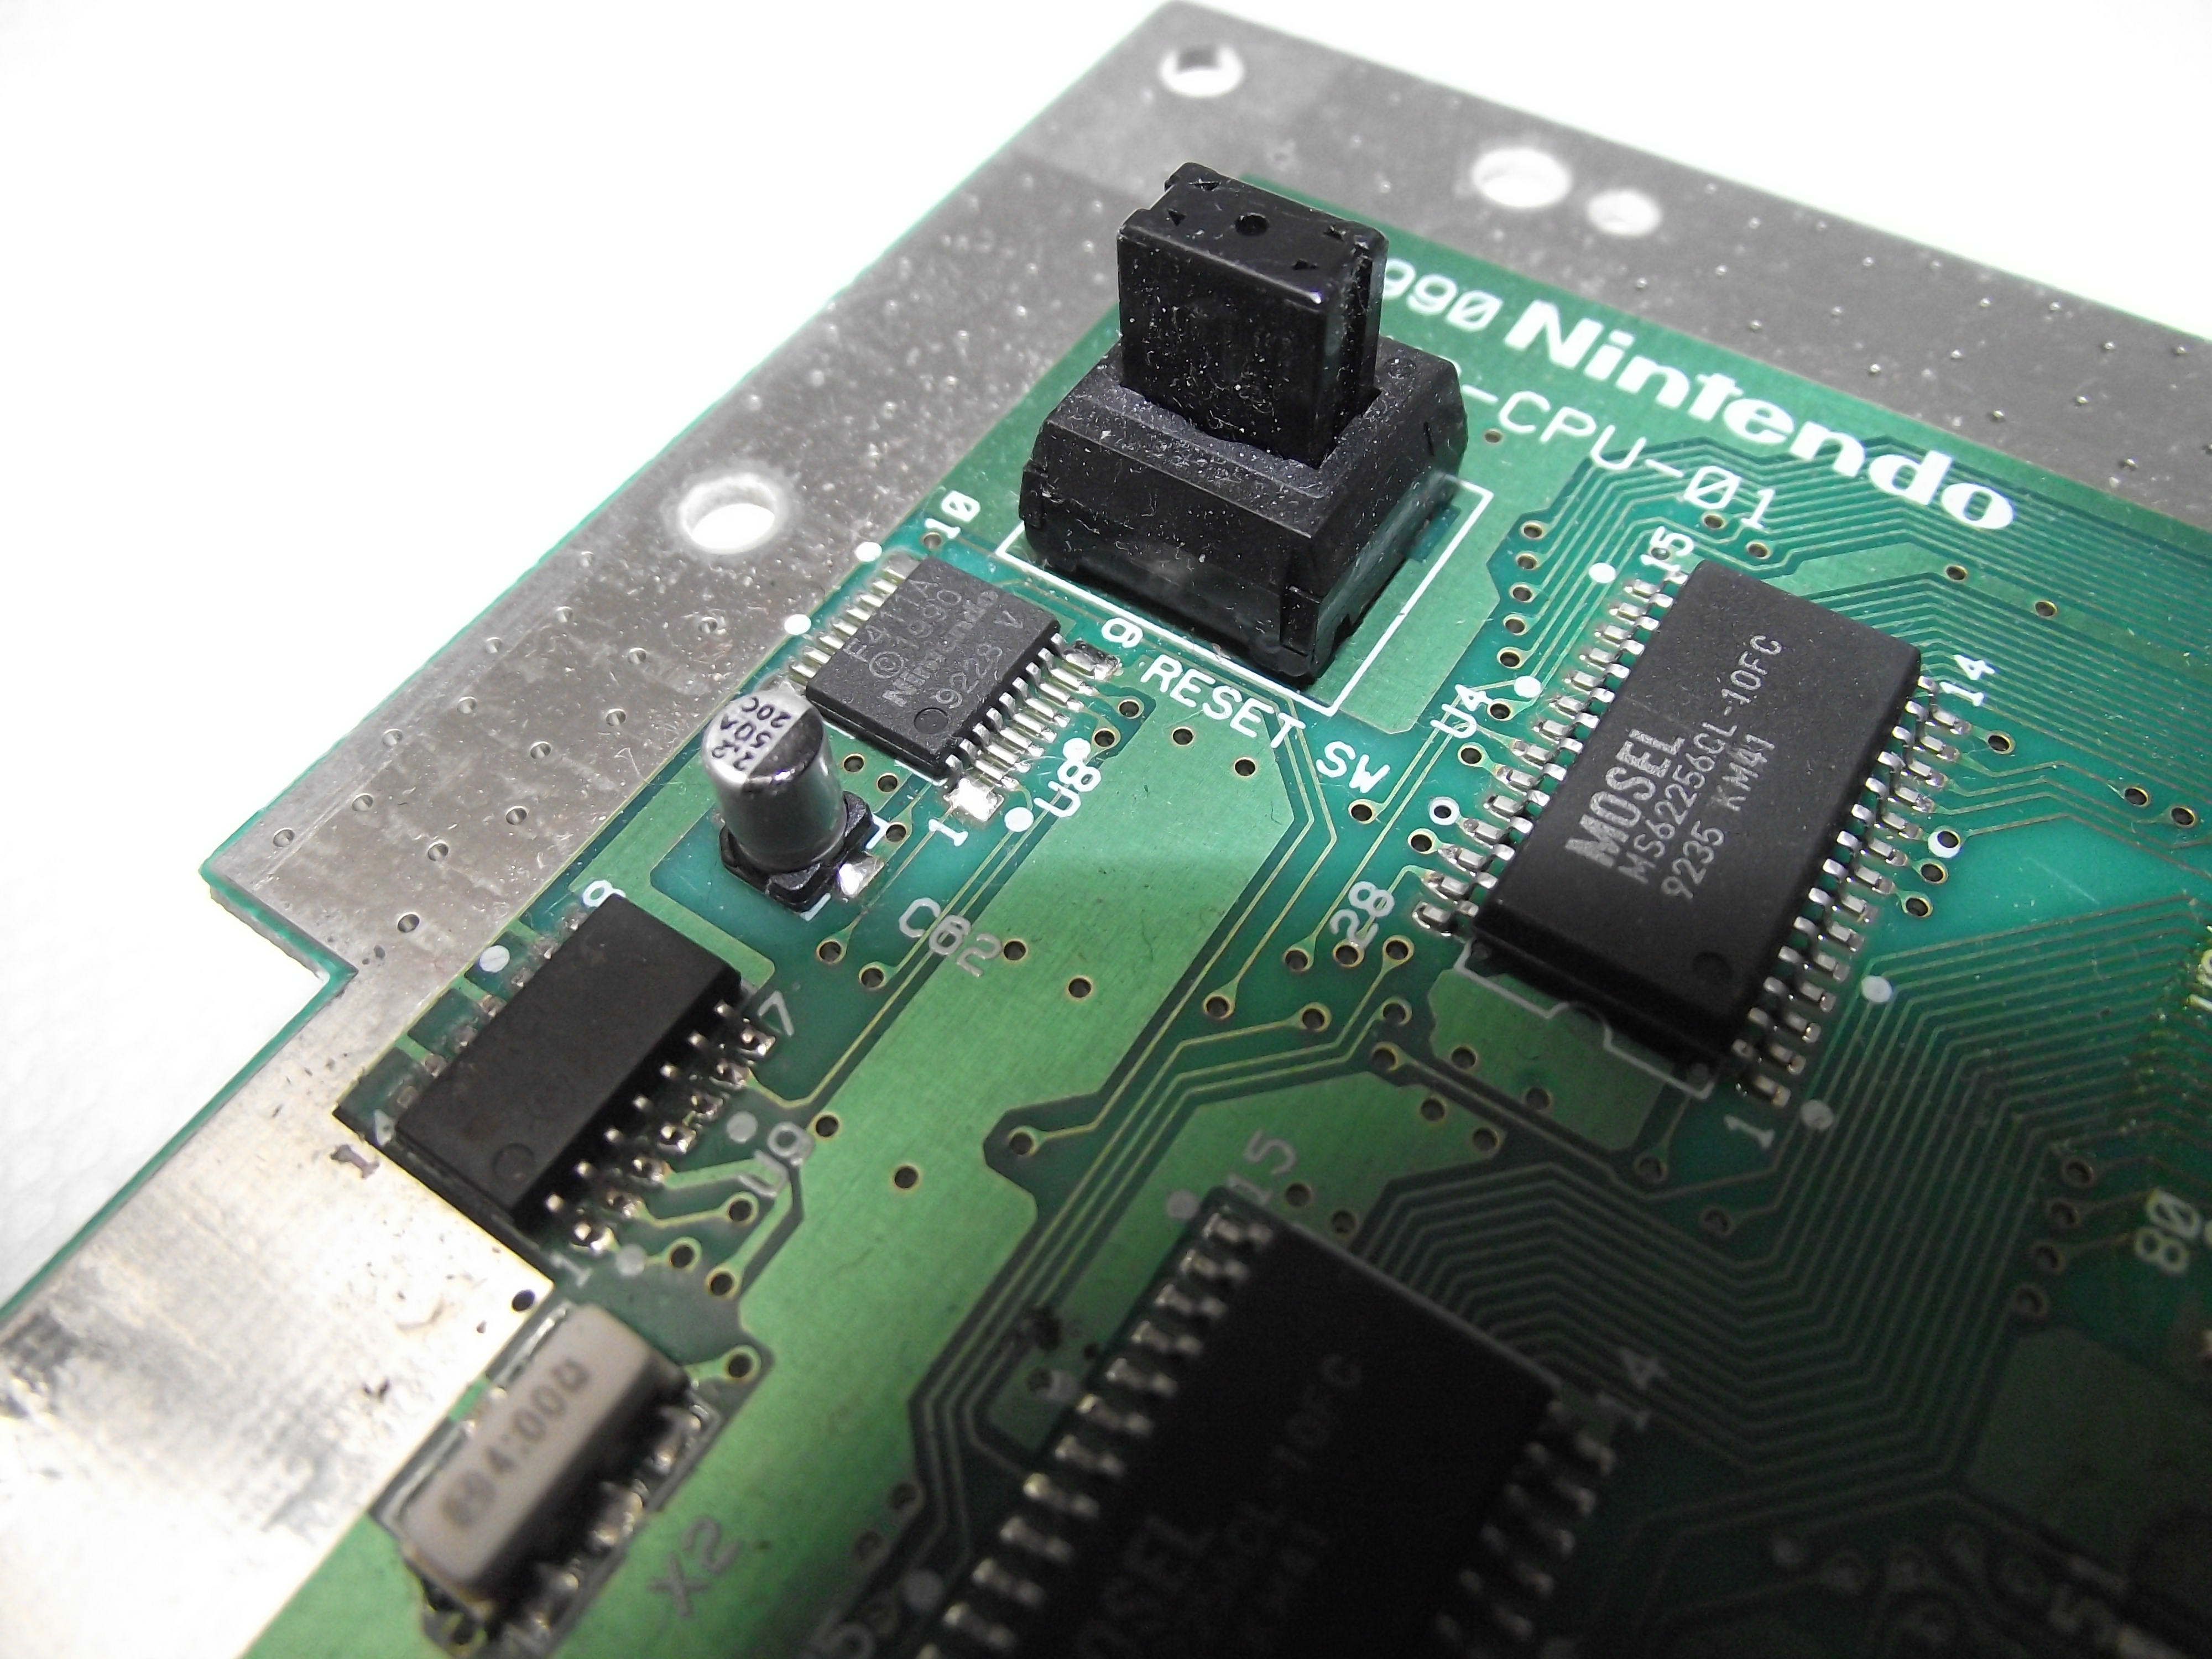
C62 and the reset button.
C62 is a small 2.2µF capacitor right above the CIC chip, near the reset button. I’m told that if this is bad it has basically the same effect as holding the reset button down, resulting in a black screen on all games. Again, I’ve never actually come across a system where this had happened, but it’s an easy thing to replace, so I sometimes try replacing it if it looks funny. It has never fixed anything for me though.
I’ve seen this next thing once and only once. Since it happened once though, it does have a place in my flowchart, since I suppose I could come across it again.
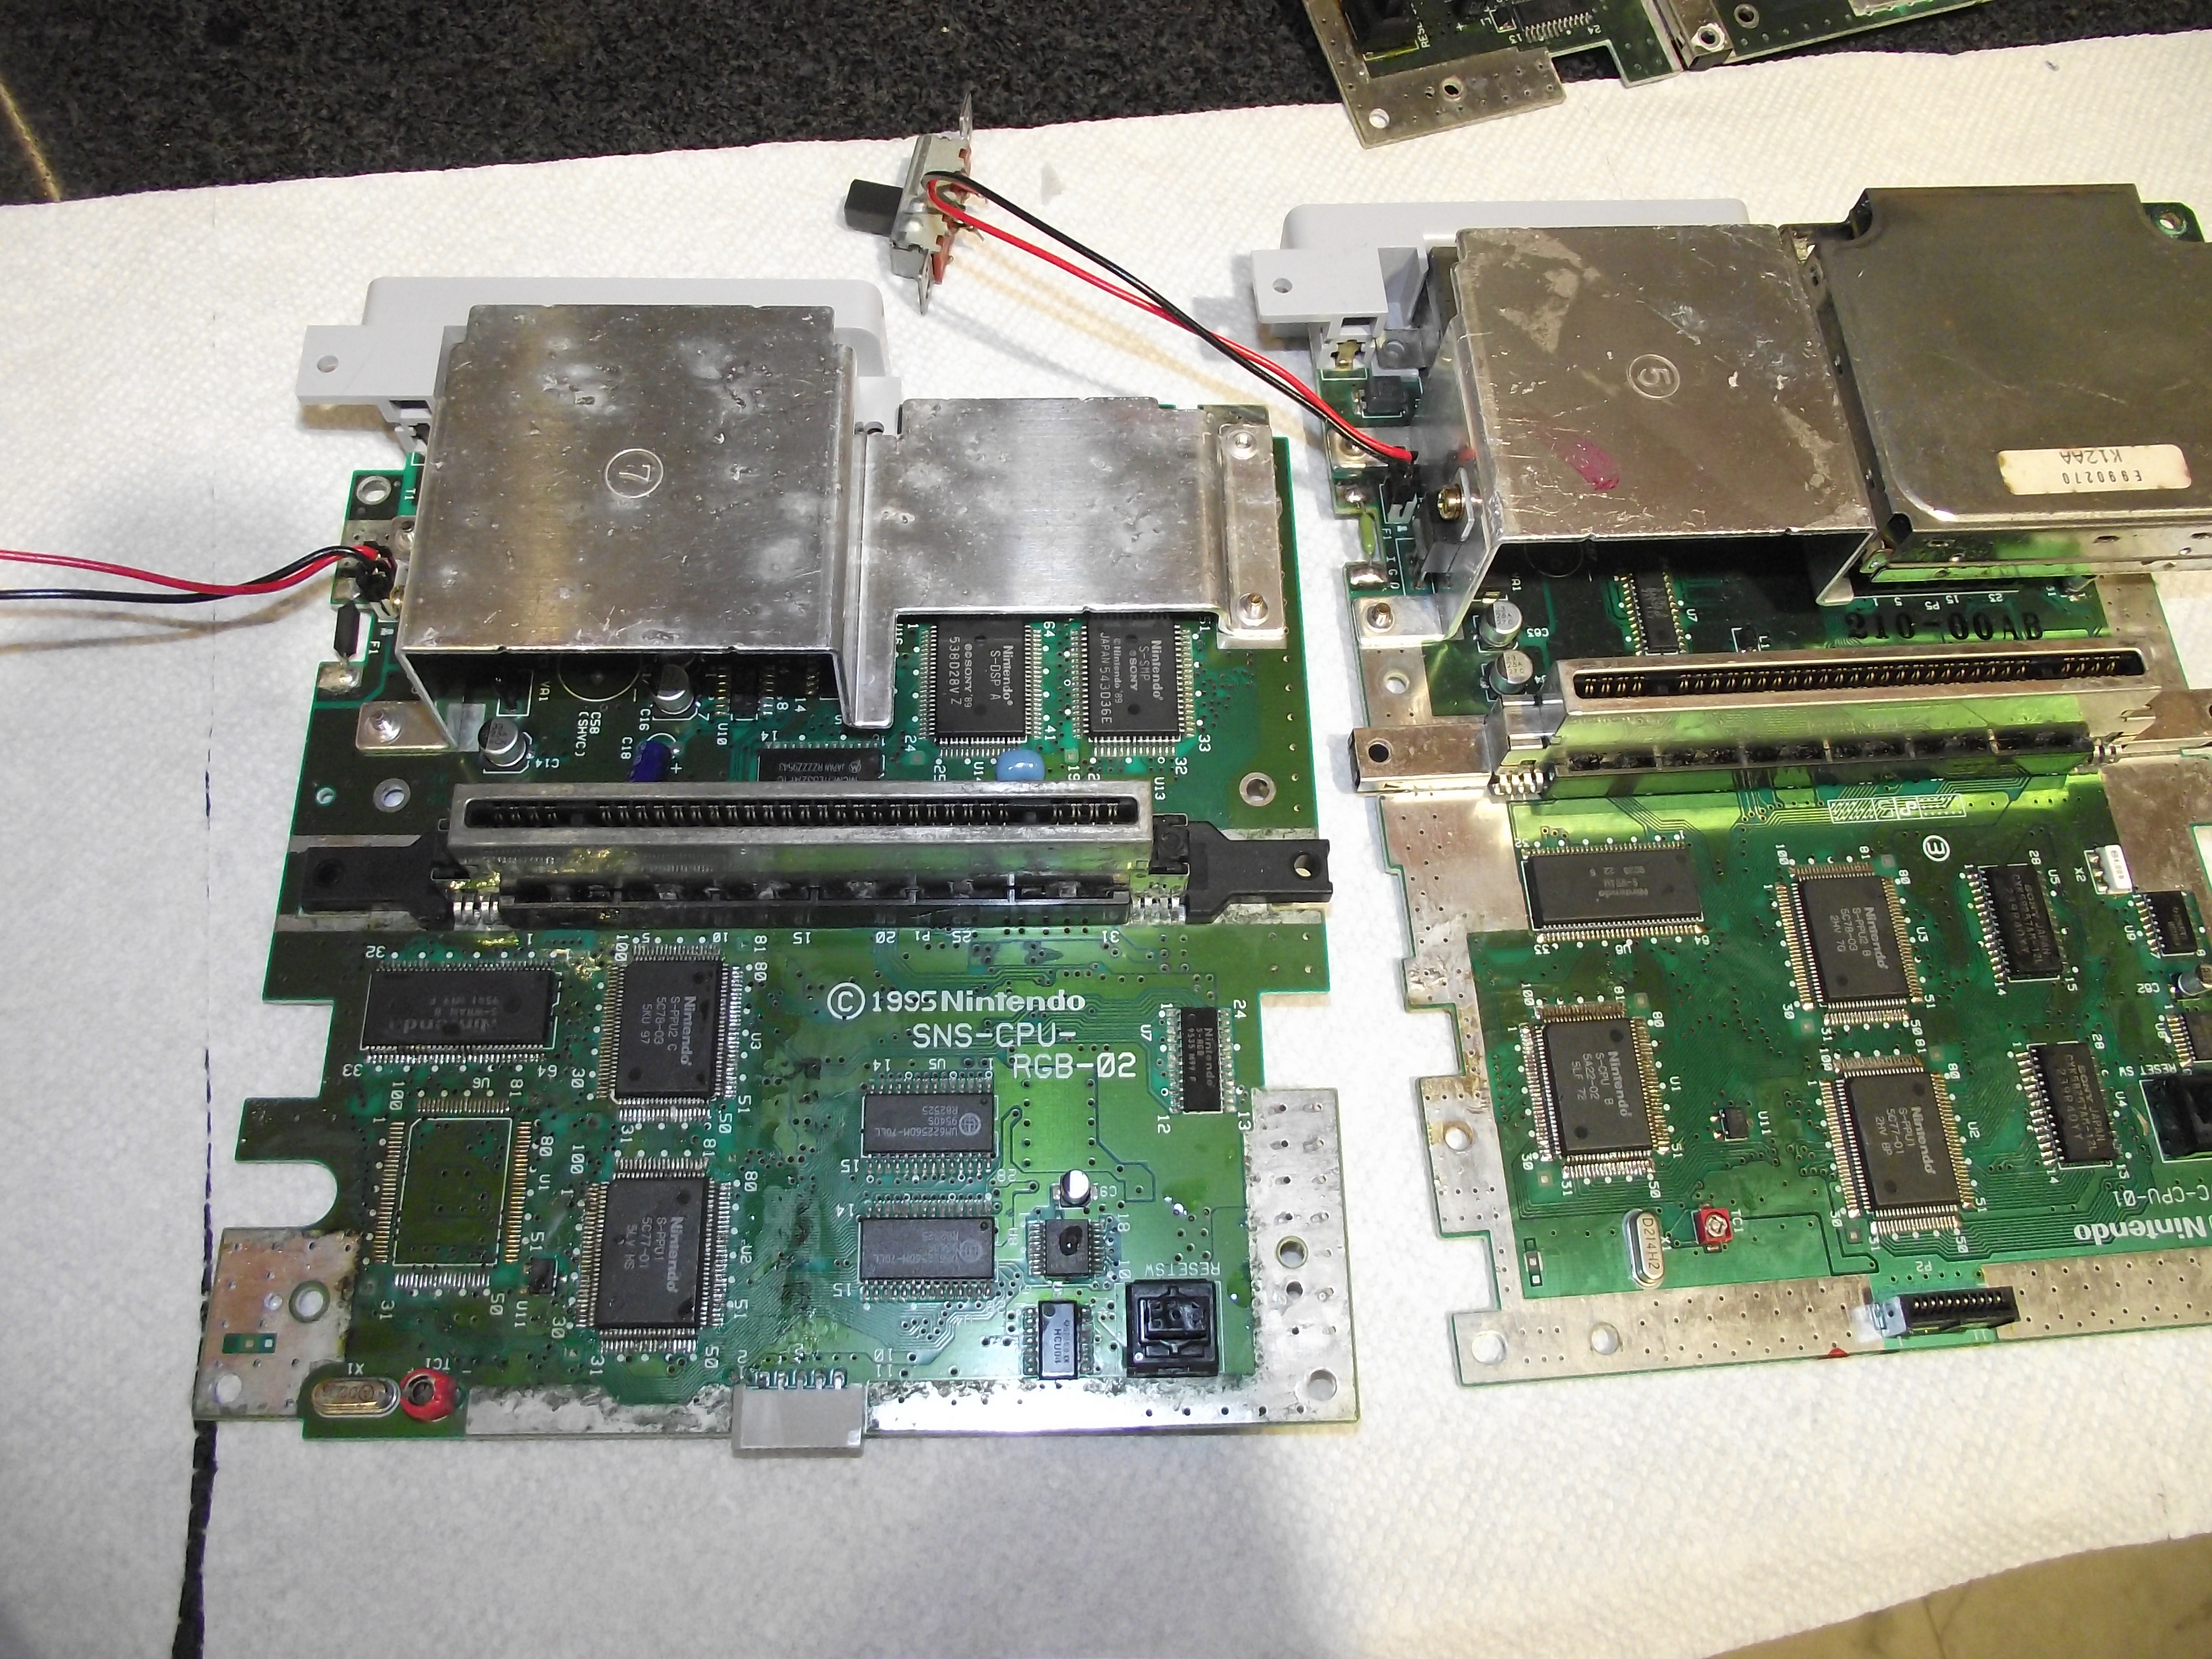
I flip the board upside down and do a visual and tactile check of the solder joints on the bottom of the cartridge slot. When I say “tactile” what I really mean is that I press on them one at a time with my fingers to see if they’re cracked. It doesn’t hurt to quickly reflow them all. It almost never fixes anything, but it can help you eliminate the cartridge slot completely as a possibility. If you are an insane person you can get a multimeter, connect the top removable connector, and then check each pin on the bottom of the board for continuity with the corresponding pin inside the removable connector. This is a colossal waste of time though and you should only do this if you are a masochist. Even with a third hand tool, you’ll nudge the board constantly, your hand will slip, you’ll drop one of the probes, you’ll lose count of which pin you were at and have to start over and you will want to off yourself in no time. Besides, you really don’t need to test. It’s never the cartridge slot that causes these issues. When it comes to the cartridge slot, if everything looks good, it is good. The one time I had a system where this sort of thing was an issue, the solder joint was so badly cracked on the underside of the board I could wiggle it with my finger. If something is wrong it will be obvious.
Next is to check for broken traces. There are no shortcuts here. You just need a jeweler’s loupe and a lot of time on your hands. What I’ve learned from experience though is that you shouldn’t waste your time on this step unless you have good reason to suspect there will, in fact, be some broken traces. Basically that means if you have a system that had liquid damage or was in a very damp, wet, humid, or dirty environment you may want to spend some time looking at it carefully under magnification. So if you open it up and find lots of rust or dead bugs, it may actually have some broken traces. But if you open it and it’s nice and clean, don’t waste your time. Unless, of course, someone else worked on it prior to you. If that’s the case, you should absolutely check for broken traces, scratches, lifted solder pads, and that sort of thing, since you never know what the last guy may have done to it.
If the system is an SHVC model, yes, you can try swapping out the sound module. Some games will give a black screen if the sound module is disconnected or bad. But many games actually load to the first screen and freeze when the sound module is bad or disconnected, so if you’re using a game like that and you get a black screen, don’t waste your time, since it’s not the sound module. An Everdrive will load and display the contents of your SD card even with a bad/disconnected sound module. If you try to run a ROM, it’ll freeze.
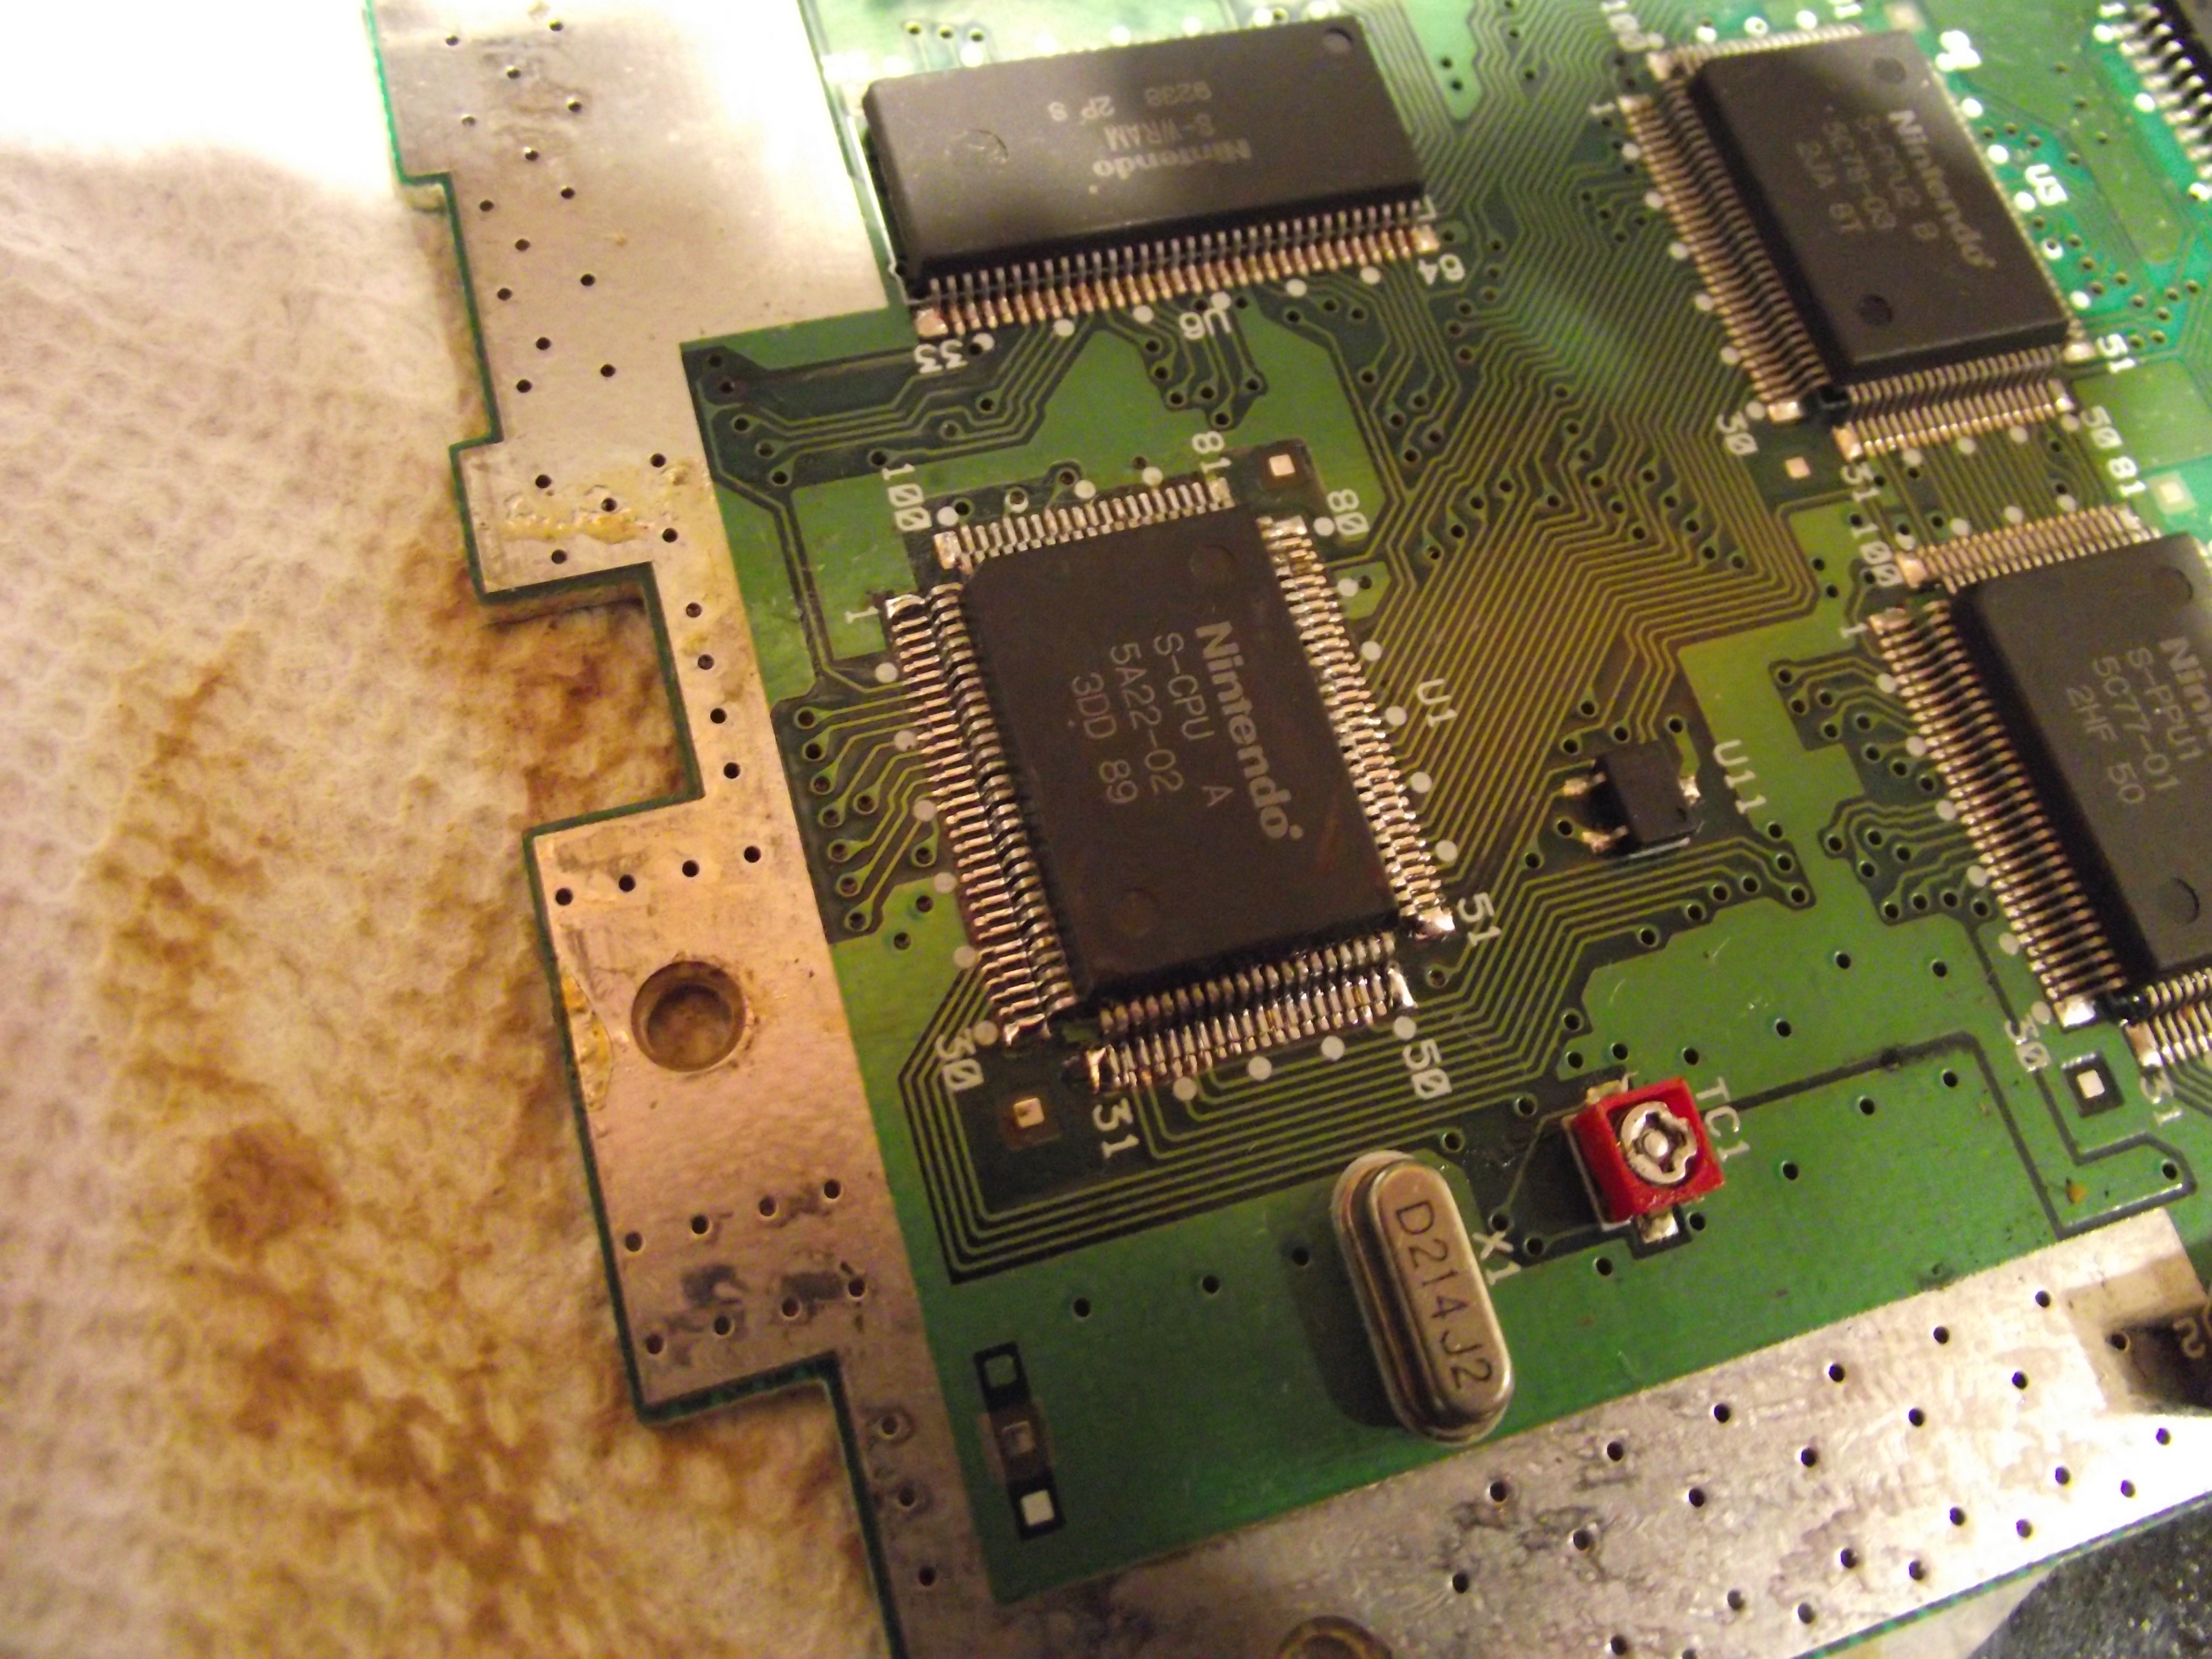
An Everdrive, by the way, is something that can be very helpful when you’re not quite sure of the extent of the problem. Some systems may give a black screen on most games, but display garbled graphics on another. Still others give a black screen on 9 out of 10 games but might play one specific game just fine. Those consoles may have hope. To help understand the extent of the problem a bit better I see if it’ll read an Everdrive. If it reads the Everdrive and loads the burn-in test rom, I run it and see what it says. These black screen systems may not read any retail games, but sometimes they do read the Everdrive, though it doesn’t always actually load up fully. It often crashes when trying to display the contents of the SD card. But if it does load and I can get the burn-in test rom to run, it usually is very straightforward and simply says, “CPU —— FAIL”. That’s about as clear-cut an answer as it gets. Almost all the failures are CPU-related, but occasionally you do see some VRAM problems. Those are nice since you can easily grab the VRAM from another console. There’s also plenty of space between the pins so soldering them in is easy. But I’ve only seen bad VRAM two or three times and those had all been worked on previously. I don’t think the VRAM is typically prone to failure. Normally it’s a CPU problem.
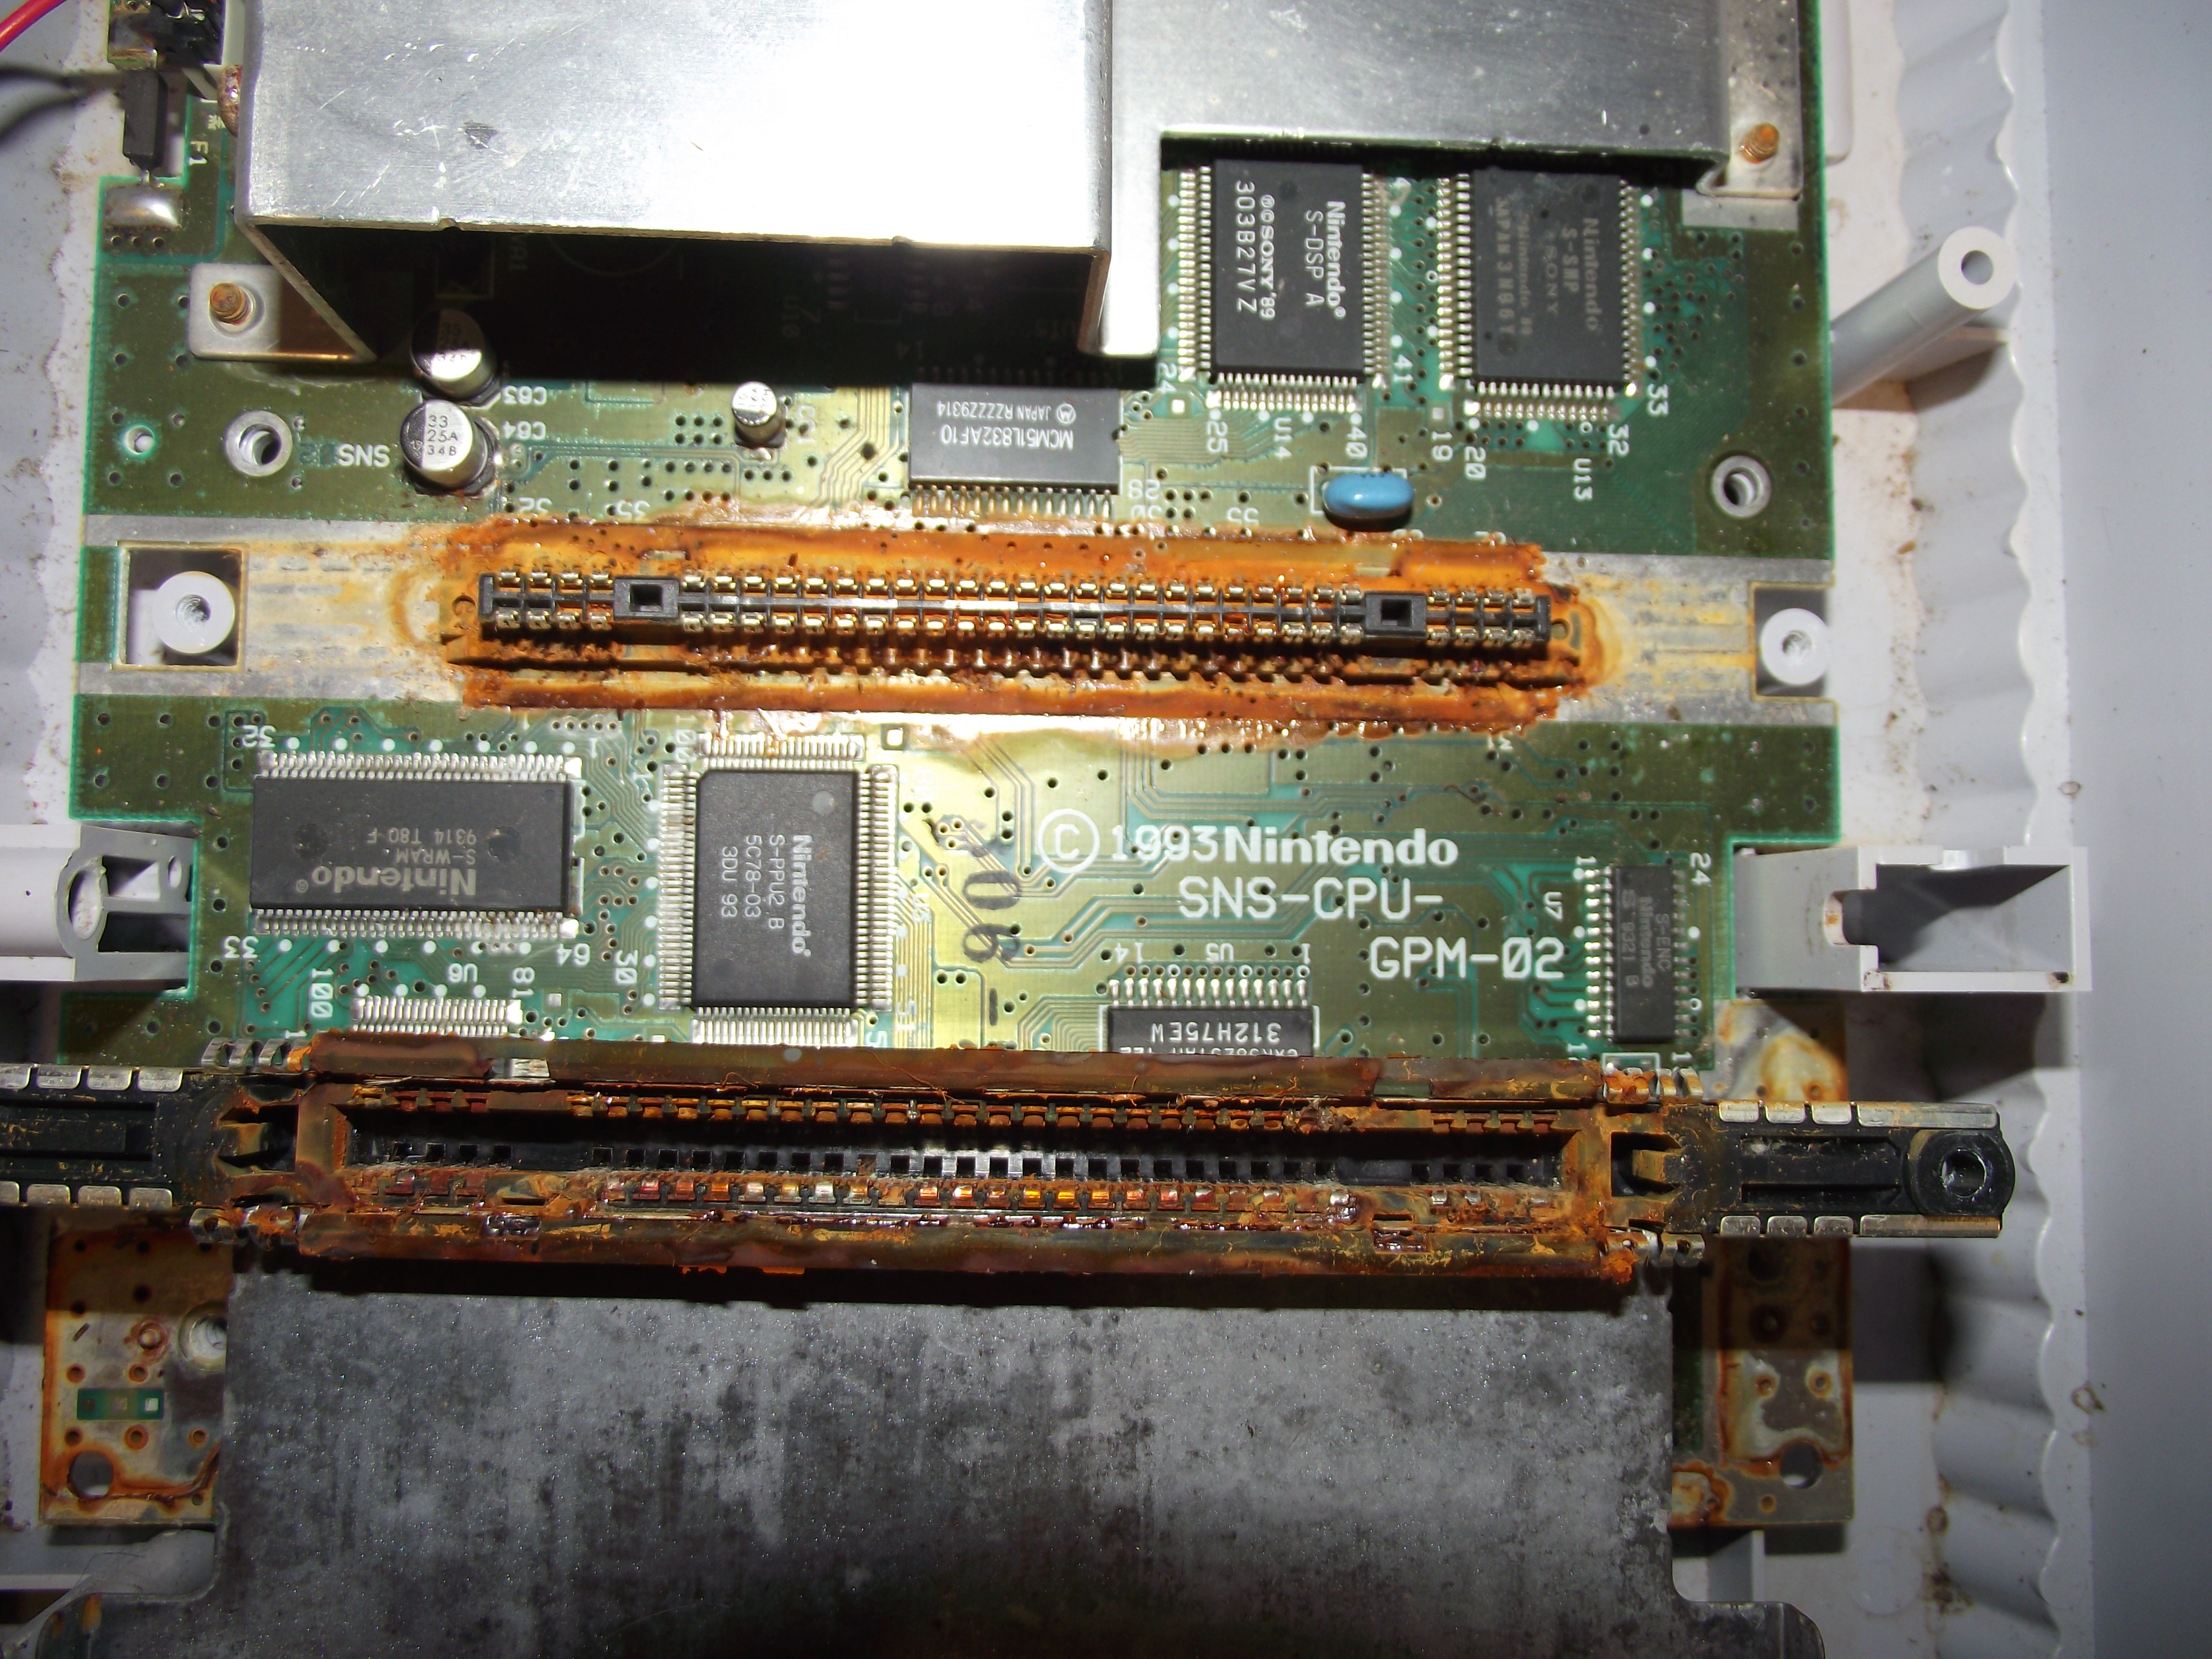
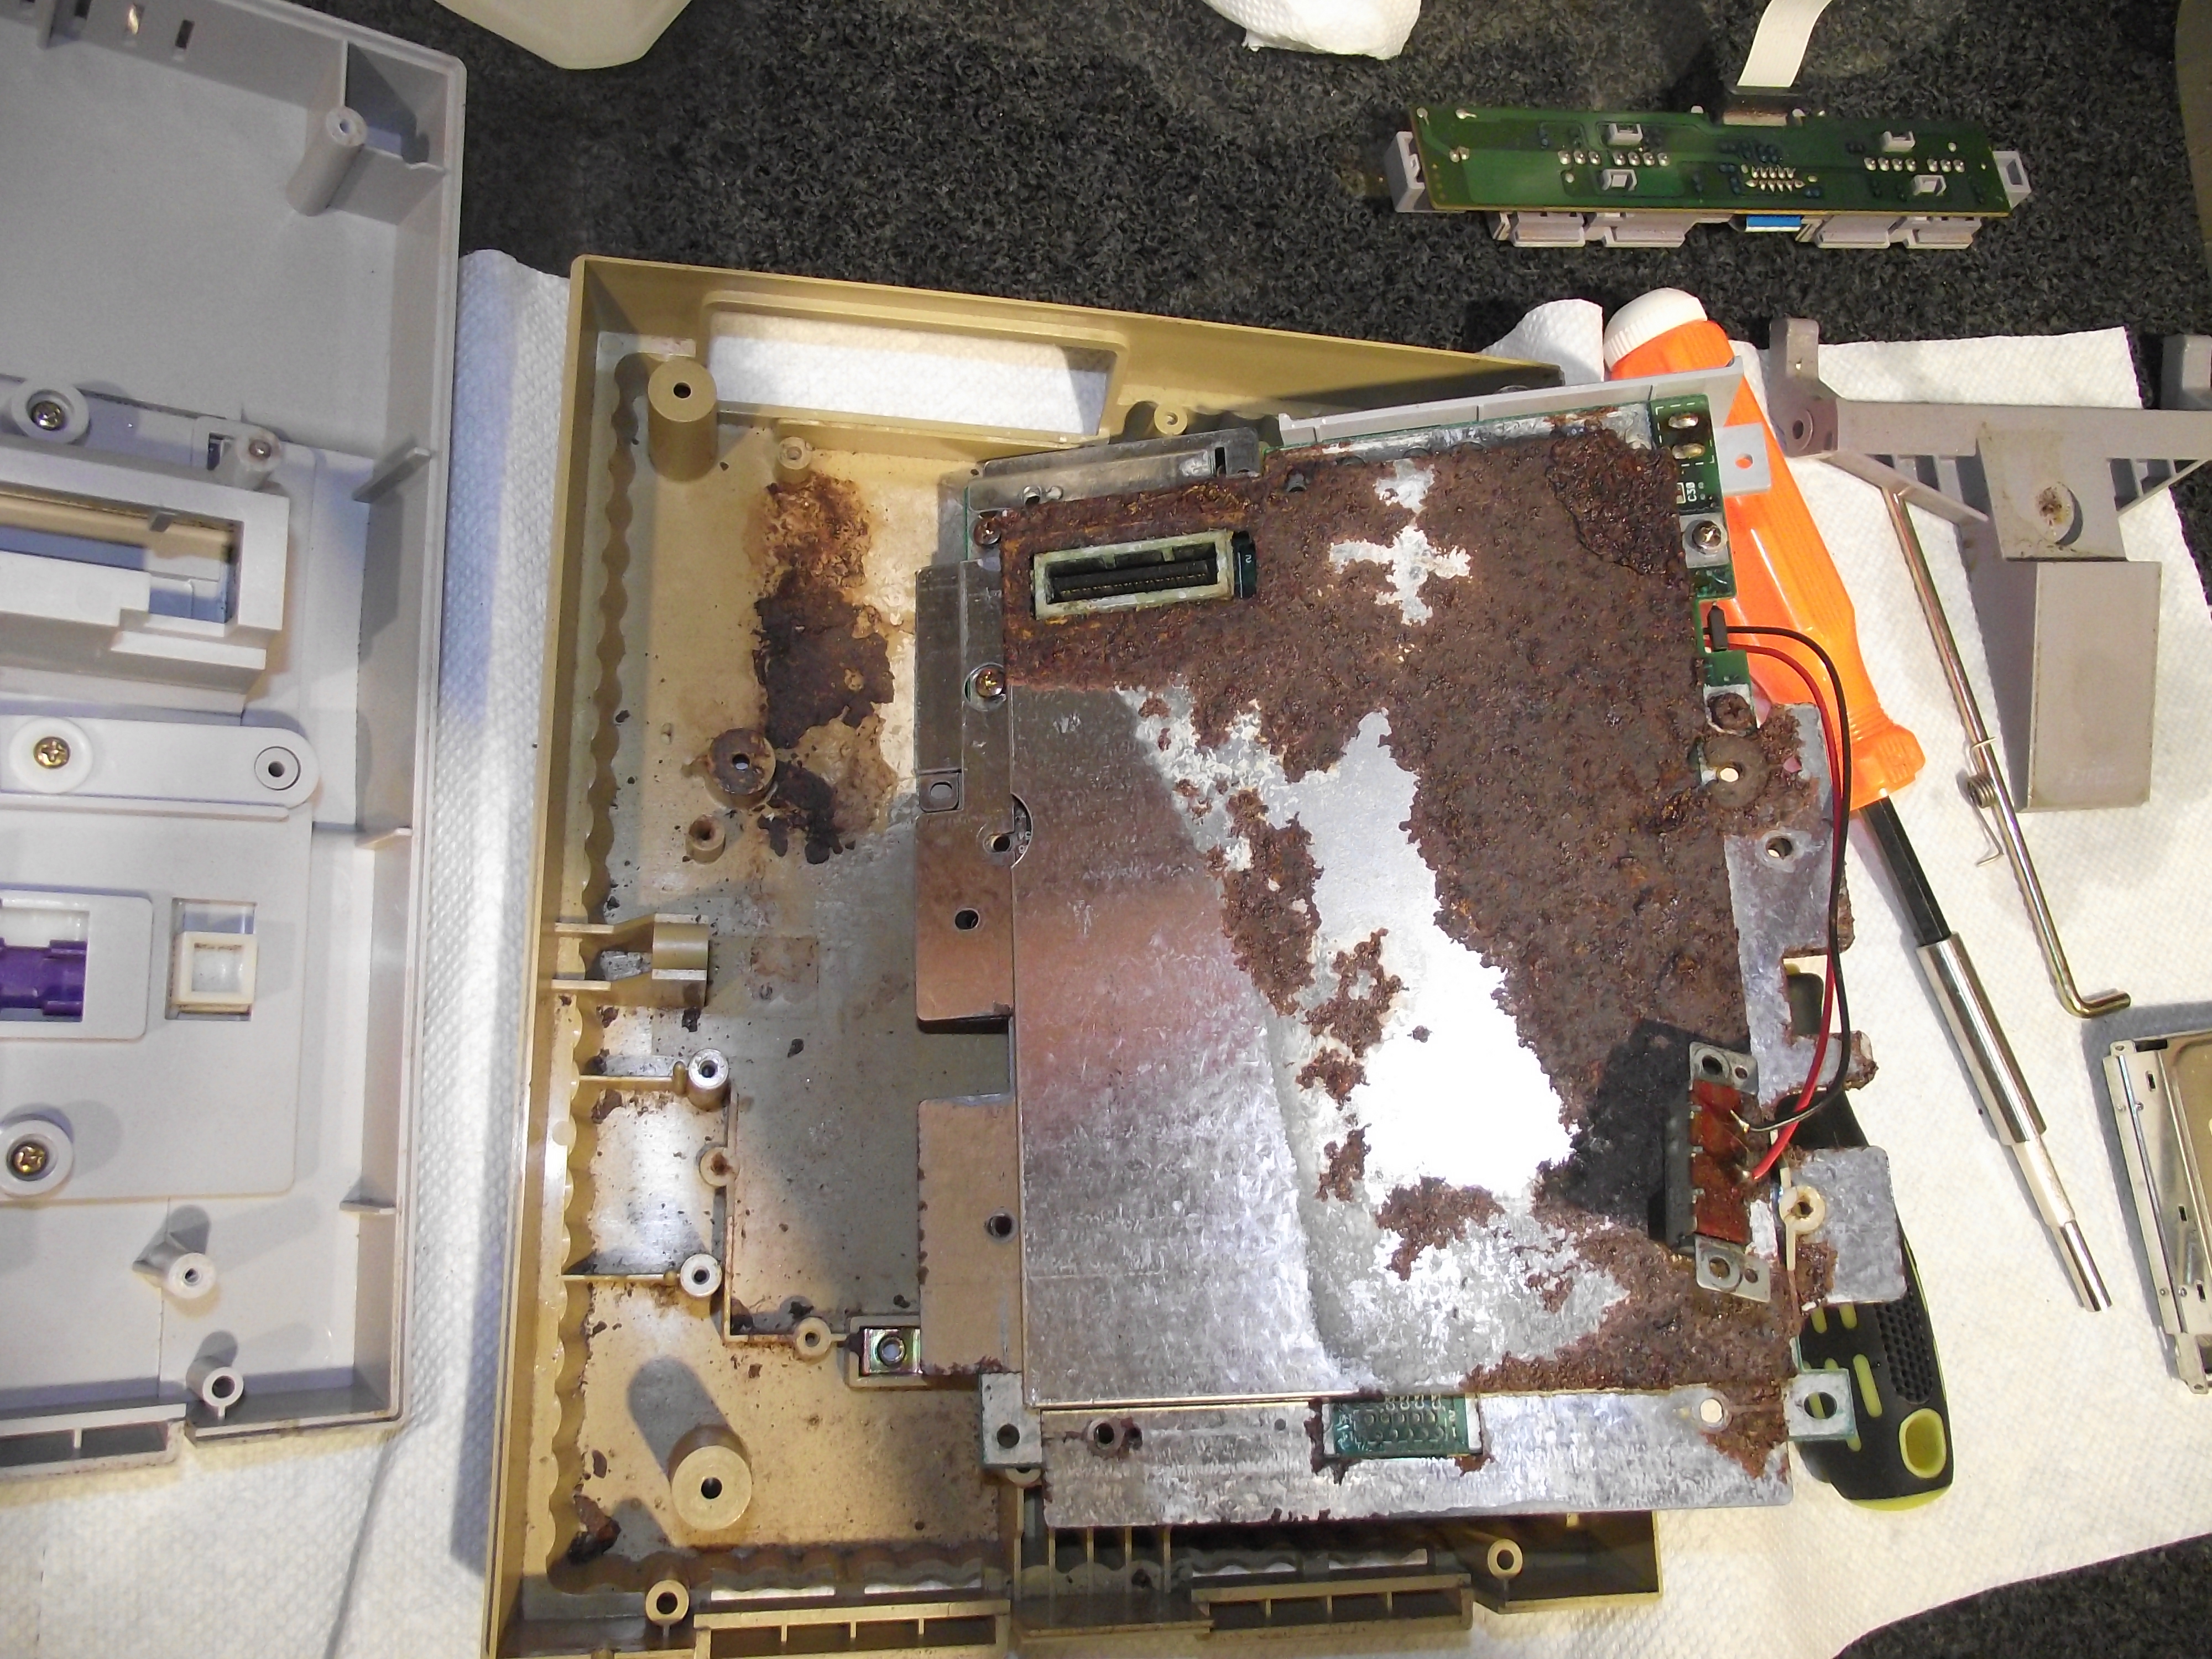
At this point the only thing left is to replace the CPU. That’s not as hard as it sounds if you have hot air rework equipment. It’s very easy to remove the old CPU, but you do need to be moderately good at soldering to put in the new one. I usually end up with a few solder bridges at the end that need to be fixed. The hardest part though is locating a good CPU. The reason I have dozens of dead black screen SNES boards is because I have no good CPUs to put in them. Most, I’m sure, would work fine with a new CPU, but the trouble is that there’s nowhere to get them. I found a few IC dealers online that claim to have a small quantity in stock, but they are asking such high prices it would actually be cheaper to buy working SNES consoles for the CPUs than to buy from those bloodsuckers. When I get really badly water-damaged or otherwise screwed-up boards I take the CPUs. Sometimes they’re bad, too. But occasionally they’re good and I can revive one dead system from my stack. It always feels good. Plus I end up producing some unique SNES consoles like 1990 SHVC boards equipped with the later (and much more resilient) “S-CPU B”, which was normally only found in the GPM-02, RGB, and APU motherboard revisions.
Don’t worry. I didn’t cannibalize a working RGB board. It had been eaten up by roaches and was totally beyond repair with lots of broken traces and the solder mask peeling up all over the place.
Pingback: “Blast processing” in 2019: How an SNES emulator solved overclocking – Right tech
Pingback: “Blast processing” in 2019: How an SNES emulator solved overclocking – Future tech
Pingback: “Blast processing” in 2019: How an SNES emulator solved overclocking – Insider tech
Pingback: “Blast processing” in 2019: How an SNES emulator solved overclocking – Easy tech
Pingback: “Blast processing” in 2019: How an SNES emulator solved overclocking – Experts tech
Pingback: “Blast processing” in 2019: How an SNES emulator solved overclocking – TechBits
Pingback: “Blast processing” in 2019: How an SNES emulator solved overclocking – Beginner Tech
Pingback: “Blast processing” in 2019: How an SNES emulator solved overclocking – Beginner's tech
Pingback: “Blast processing” in 2019: How an SNES emulator solved overclocking | Learn With Ashik
Pingback: “Blast processing” in 2019: How an SNES emulator solved overclocking - Technorites
Pingback: “Blast processing” in 2019: How an SNES emulator solved overclocking – Middle tech
Pingback: “Blast processing” in 2019: How an SNES emulator solved overclocking – Good tech
Pingback: “Blast processing” in 2019: How an SNES emulator solved overclocking – Great tech
Pingback: “Blast processing” in 2019: How an SNES emulator solved overclocking – Ars Technica | UK News Today
Pingback: "Blast processing" in 2019: how an SNES emulator solved overclocking – Tech Info Tips
Pingback: “Blast processing” in 2019: How an SNES emulator solved overclocking – My Home Tech Reviews
Pingback: “Blast processing” in 2019: How an SNES emulator solved overclocking – Apun Ka Soft
Pingback: “Blast processing” in 2019: How an SNES emulator solved overclocking – UK 09 History
Pingback: “Blast processing” in 2019: How an SNES emulator solved overclocking – Right tech
Pingback: “Blast processing” in 2019: How an SNES emulator solved overclocking – Dunyayi Kesfet
Pingback: “Blast processing” in 2019: How an SNES emulator solved overclocking – CyberSide Tech News
Pingback: “Blast processing” in 2019: How an SNES emulator solved overclocking – News Tech Dude
Pingback: "Blast processing" in 2019: How an SNES emulator resolved overclocking - Science and Tech News
Pingback: “Blast processing” in 2019: How an SNES emulator solved overclocking – Health Care Fari Tech
Pingback: “Blast processing” in 2019: How an SNES emulator solved overclocking - USA DAILY NEWS
Pingback: “Blast processing” in 2019: How an SNES emulator solved overclocking – makitzo
Pingback: “Blast processing” in 2019: How an SNES emulator solved overclocking - Britanya
Pingback: “Blast processing” in 2019: How an SNES emulator solved overclocking – News for ThoughtPeople
I have a strange problem no one can seem to figure out. I got an SNES from Ebay and all the games that came with it (including star fox) work on it fine. I bought separately, Killer Instinct, Mortal Kombat 2, Mario World, and Legend of Zelda Link To the Past. Killer instinct plays fine, but the other 3 do not, however they do in the system at the store I bought them from. Mario comes on and will let you start a game, but when it goes to the map it’s glitched and wont let you move around, the other 2 just bring up the Nintendo logo or credit screen and go blank. We even tried other games in the store, like the Toy Story Game, worked fine, however none of the Mario or Mortal Kombat games they had in the store would work. Any clues? I have cleaned the system and the games, taken it and games apart and even cleaned under the pin connector in the system. Nothing seems to be fixing my problem. Any help would be great.
Sorry, but that sounds like a bad CPU to me. When you opened the console did you see if the system has either S-CPU or CPU-A in it? If it’s an SHVC or GPM-01 motherboard it’ll have one of those two.
If it has either of the two earlier CPU revisions I’d say that’s probably the issue. I’ve had some consoles with the same type of problem. They’ll play a few games just fine but crash or glitch out with others. The strangest one I remember was a console I had that seemed to show just a black screen on all games. I had cleaned and replaced the cartridge slot with a known good one and there was no change. But then I tried Battletoads in Battlemaniacs. For some reason that was the only game out of about a dozen I tried that worked. It even seemed to play normally from the 5 or 10 minutes I tested. But no other game would work at all so I replaced the CPU. Once I replaced the CPU it worked fine and played all games normally.
If the CPU is the issue then unfortunately I’d say it’s easiest just to replace the motherboard entirely. There’s no sense cannibalizing a good board by removing its CPU just to fix a different board. I was only ever able to fix consoles with dead CPUs by harvesting replacement CPUs from really severely damaged donor boards that were otherwise irreparable (mostly with heavy liquid damage). So I’d say either replace the console and sell the old one on eBay for parts or see if you can find a cheap working console with cracked housing and a good motherboard so you can swap the boards.
Pingback: “Blast processing” in 2019: How an SNES emulator solved overclocking – NuclearCoffee
I have a sfc with black screen. For sure it’s the CPU.
And another with CG RAM error. It seems the problem is with ppu-2. I have that.
I had/fixed a few consoles with problems. Only one time I had a broken trace, only one time it was one of the ram chips. About 2 times it was one of the ppu. Most of them had dead cpu.
I also had a console where the B button wasn’t working. I swapped the cpu on another board. Yes, it was the cpu.
Wow, thanks for that information. It’s really interesting that you found one with a bad RAM chip. I’ve heard about those failing sometimes but I’ve still never seen it myself. Fortunately those are easier to replace than the CPU or the PPUs.
It’s always funny to me when a bad CPU causes problems with the controls while everything else works correctly. You might think it’s an easy fix and you can just replace the controller ports. But nope! It’s never that easy, haha.
Pingback: 1Chipスーパーファミコンが突然何も映らなくなった? “Black Screen of Death”が発生したときのチェック項目メモ - レトロゲームで遊ぼう!
Hey 🙂
Thank you for this great article. After cleaning the game connector my SNES started again and showed the game. But now, after some seconds or minutes, it went black again. I tested it with two different games.
Do you maybe have an idea to fix this problem? Could it be a broken capacitor?
Thank you 🙂
Cheers,
Eric
Hi,
To me my first thought would be that it’s a bad CPU. Does your console have either S-CPU or CPU-A in it? Those are the two earlier CPU revisions that frequently fail.
If you have a flash cart I would suggest running the SNES Burn-in Test to see what it says. Sometimes that’ll just tell you straightaway that you have a bad CPU. Also, if the test crashes or doesn’t run at all, then that almost always means the CPU is bad.
If you don’t have a flash cart but you do have access to more games then see if any of them display a garbled mess when you try to load them. If some games just show solid lines, or squares, or a bunch of garbage pixels on the screen, then it’s usually a sign the CPU is bad, even if other games do launch correctly. This is assuming the cartridge slot and the games are in good, clean condition though. Sometimes poor contact in the cartridge slot can cause the same issue, so it’s not a 100% guarantee that it’s the CPU.
In my experience bad capacitors on an SNES don’t usually cause issues like this. The most common symptoms of bad capacitors that I’ve seen on SNES systems are washed out, darker than usual colors or buzzing in the audio. But usually games will still run fine, even with failing capacitors.
If your console has CPU-B then the CPU probably isn’t the issue. But at that point I’m not really sure what would be causing the problem. I guess it’s possible it could be a PPU issue, but those don’t usually cause the screen to go totally black. A bad PPU will usually cause graphical distortion but the game will usually continue to run, at least.
Thank you very much for the detailed information 🙂
Mine is a one chip and it has “S-CPUN A” printed on. Since I couldn’t find any other hints on that specific error I’ll go find a new CPU and don’t start replacing the capacitators. Since I don’t have a flash card.
Sad though, because the games run perfectly until the console goes black.
Thanks again for clarification 🙂
Cheers
Eric
No wait, before you do that I would suggest asking around a bit more. If it’s a 1-chip I don’t think you should replace the S-CPUN chip. I’ve never heard of that failing. I wouldn’t want you have to go to so much expense and effort if that’s not the issue. Plus that’s a really tough soldering job.
I don’t really have much experience repairing 1-chip consoles. I mostly work on the older models. That’s why I had assumed it might be the CPU. But I doubt it’s the S-CPUN chip, since those don’t usually fail, as far as I ‘m aware.
One relatively common issue though with 1-chips is if the S-APU sound chip fails then many games will freeze at the first screen (usually where it shows the name of the publisher). Other games don’t start at all. Super Mario Kart, for example, will freeze at the screen that says “Nintendo”. If your games freeze before you can even start playing, then this could be the problem. But if they run long enough to actually begin gameplay then this wouldn’t be the issue.
I’d suggest maybe asking if anybody at the Obscure Gamers forum can help. There are some experts there who probably know a lot more than me.
Hi, First of all great summary of the possible Black Screen reasons. I have a problem with a PAL-1-chip-SNES. I bought it to install a 50/60 HZ Uigr board and cleaned the console with 99% IPA as i was waiting for the additional board.
When assembled again i tried to test it but got only a Black Screen with no Audio too. I tested a few cartridges and also used two of my 3-chip-SNES for the tests and both of them worked fine in each scenario while the 1-chip-SNES did not.
I think i did not discharge the console before opening but i am not sure. As i used a dentist tool to get the dirt out of the cartridge slot i may have produced a short circuit. The fuse did not blow which means that possible short circuit may have damaged something on the board. I resoldered all of the 62 pins a d also tested them with a Multimeter and i got that „beep“ 62 times 🙂 I also can confirm the trouble of this procedure as explained by you :-))
The SD2NES also shows its working LEDS when powering the console but there is another difference between the faulty one and the two working 3-chippers. When powering on the two working ones WITHOUT a cartridge they both show a Black Screen as expected as there is no cartridge in the slot but on the faulty one powering on WITHOUT a game does not bring any reaction to the screen.
What do you think? As the console was working fine before cleaning and i did nothing specific internal except the above mentioned this 1-chip-SNES may be dead now? I am not that used in soldering to desolder the PPU and use another PPU of a working 1-chipper to test if that is the reason for the problem.
Thank you in Advance and best regards from Austria (not Australia :-))
Max
Hi,
I’m so sorry. I wish I could help, but I don’t have much experience repairing 1-chip consoles. I’ve come across a few 1-chip consoles with the same problem as yours. No signal on the TV at all. Not even a black screen. But I never figured out what the problem was.
All I can say is that it’s probably not the S-APU chip. When the S-APU chip fails you do still get a signal to the TV. You see either a black screen or the game freezes at the first screen.
It might be worth asking over at the Obscure Gamers forum to see if anyone there might know. There’s a repair forum there with a lot of very knowledgeable people.
Best of luck to you.
Hello again, Thank you for fast reply. I ordered and received another 1-chipper in the meantime, discharged it and cleaned it only with compressed air this time. I also prepared the whole mainboard for the additional UIGR-board (Lifted pin 111 of S-CPUN and pin 9 of S-RGB and also removed the original CIC with a hot air gun). Worked like a charm for my standards :-)) I hope i‘ll receive the additional board from France next week to finish the installation. Also fingers crossed that i will get no Black Screen when powering up after.
I did the same mod on a 3-chip-SNES last week and it works fine even when i also forgot to discharge but had luck as only the fuse was blown.‘
Hello again,
Thank you for fast reply. I ordered and received another 1-chipper in the meantime, discharged it and cleaned it only with compressed air this time. I also prepared the whole mainboard for the additional UIGR-board (Lifted pin 111 of S-CPUN and pin 9 of S-RGB and also removed the original CIC with a hot air gun). Worked like a charm for my standards :-)) I hope i‘ll receive the additional board from France next week to finish the installation. Also fingers crossed that i will get no Black Screen when powering up after.
I did the same mod on a 3-chip-SNES last week and it works fine even when i also forgot to discharge but had luck as only the fuse has blown which was easy to replace.
I will sell the faulty SNES with reference that it is not working. Maybe someone with advanced skills can bring it back to life. I learned it the hard way but if the 2nd one will work in the end then everything is fine. I think almost every guy who is interested in modding has made some similar experience:-)
Is there no need to discharge US SNES before opening the device? I never read about that matter in US sites but found many search results about it when looking on European pages.
Glad you got one that’s working 😉
It’s probably a good idea to always discharge the console before opening it. I think the main reason is the big 1000µF power filter capacitor. Most North American SNES motherboards don’t have this capacitor. Only the very first North American SHVC motherboards have it. It was removed for the later North American revisions, including 1-chips. But I think most, if not all PAL consoles have it. So maybe that’s why it’s not always mentioned on US sites.
Thanks for the explanation. Now the different turorials make really sense.
I modded my 2nd 1-Chipper in the meantime with the board from France. Works like a charme 🙂
Hello.
My SNES gives me black screen on most games. But some games like Super Mario World will load the title screen and then the graphics will glitch and the game will freeze. With Super Mario Cart I can get as far as the beginning of the race until the game freezes up. I have tried cleaning the cartridge connector. Is there any advice you can give me?
Funny thing that the console used to work perfectly but it was unused for maybe a year or so. And now it doesn’t work. What happened?
I’m so disgusted with messing with my SNES at this point!! I couldn’t find the pwr cord so I soldered the wires from a similarly rated one directly to the bottom of my PCB. I should have taken the time to at least remove the input jack first because Im pretty sure I ended up shorting it out (inside the connector). I replaced the fuse which blew, switched the original plug with a more common barrel plug and made a polarity reversing adapter to attach to PSUs I’ve got that are all center positive.
After doing all of that I’m getting 10.35 volts at the voltage input on the regulator and 5 volts exactly on the output. However my tv doesn’t even seem to recognize anything is plugged in when I try powering it on. I’ve tried with 2 games..SMW & DKC.
My version is the GPM-02 with the blue chip diode for the D1 component.
I’m actually attempting to use a playstation multi-out cord since that’s all I could find but I’ve read that they’re supposed to work fine with a SNES. Also, the PSU I’ve tried using is only rated 9 volts 800mA, which I’m thinking could be the prob, but it’s only 50mA lower than intended and with the 7805 outputting 5 volts I thought it’d be sufficient.
What are your thoughts?
Hello I have a Super Nintendo from North America. I’m trying to figure out what the problem is with it. I’m getting into console repair, refurbishing, modding with time. The SNES that I have was bought on eBay. It’s a model no. SNS-001 and has a barcode UN234527809. It comes with the SCPU-A and has two PPU’s. The thing with my system is that it plays all the games perfectly the only game that it has trouble with and only lets me play for the first level and then freezes is donkey kong country 2, funny thing is that it always freezes on the exact point. No matter if I use two different cartridges of dk2. Dk2 is possibly my favorite game of all time in this system. I know it’s not the game because I’ve tried playing the same game while using a different cartridge of dk2 and it does the same thing. I tried both games on my brothers same model SNES and they play fine. Does anyone know what could be causing this issue. Do you think a game genie could have corrupted my system because I remember trying it out months ago on this game and other games. What I haven’t tried again is to give it a better clean but aside from that i don’t know what to do. I cleaned the game and the system. If someone has any knowledge about this issue I it would be greatly appreciated. Thank you.
Hello I have a Super Nintendo from North America. I’m trying to figure out what the problem is with it. I’m getting into console repair, refurbishing, modding with time. The SNES that I have was bought on eBay. It’s a model no. SNS-001 and has a barcode UN234527809. It comes with the SCPU-A and has two PPU’s. The thing with my system is that it plays all the games perfectly the only game that it has trouble with and only lets me play for the first level and then freezes is donkey kong country 2, funny thing is that it always freezes on the exact point. No matter if I use two different cartridges of dk2. Dk2 is possibly my favorite game of all time in this system. I know it’s not the game because I’ve tried playing the same game while using a different cartridge of dk2 and it does the same thing. I tried both games on my brothers same model SNES and they play fine. Does anyone know what could be causing this issue. Do you think a game genie could have corrupted my system because I remember trying it out months ago on this game and other games. What I haven’t tried again is to give it a better clean but aside from that i don’t know what to do. I cleaned the game and the system. If someone has any knowledge about this issue I it would be greatly appreciated. Thank you.
Hello I got an snes that I bought on eBay with super mario all stars and super Mario world but recently donkey Kong country have these artifacts and glitching out I was wondering it might either be a PPU-2 or cpu failure
hello all,
I had black screen symptoms from a SFC i purchased and after further investigation the game would boot if i pushed the cartridge slighty forward with the system plugged it. I noticed that the cartridge arm that keeps the cart in place when the console is on was pushing my carts JUST out of limits to properly boot. I removed the cartridge placement arm and every game boots up with no problems.
This might not fix yours and you may still have to do these steps but from now on removing that cart arm is going to be my very first step.
Good luck guys.